Configuration of Oracle Business Intelligence Applications is an extension of the existing Oracle Business Intelligence domain. This chapter describes how the different components of Oracle BI Applications can be installed and configured for high availability.
This chapter includes the following topics:
Oracle Fusion Customer Relationship Management is seamlessly integrated with Oracle Business Intelligence Suite to address the full range of analytical requirements. The suite consists of two products, Oracle Transactional Business Intelligence and Oracle Business Intelligence Applications (Oracle BI Applications).
Oracle Transactional Business Intelligence delivers up-to-the minute analysis of a wide range of Oracle Fusion Customer Relationship Management subject areas, whereas Oracle BI Applications provides a more comprehensive historical perspective for Oracle Fusion Customer Relationship Management that is suited to deeper analytical assessments. The product suite is meant to work together to provide customers with the ability to adapt to the rapidly changing and diverse analytical needs required by the business. For example, a customer could use the Transactional Business Intelligence CRM Sales analysis area to view up to the minute pipeline analysis near key forecasting time periods; the projected forecast could then be further validated leveraging the CRM analysis area in Oracle BI Applications to see how this compares vs. previous time periods, sales people, customers, industries, etc. enabling sales management to make adjustments that deliver a more accurate overall forecast.
Oracle Transactional Business Intelligence is an integrated product of Oracle Fusion Applications. Oracle BI Applications is an optional product that you may choose to deploy. The ETL tier of Oracle BI Applications consists of the following components:
The following sections provide more details about implementing these components of Oracle BI Applications for Oracle Fusion Applications.
Figure 18-1 shows the topology that represents Oracle BI Applications implementation in the Oracle Fusion Applications environment.
Figure 18-1 Data Warehouse for Oracle BI Applications
This section describes the following high-level tasks that are required to install Oracle BI Applications:
Before you install Oracle BI Applications, the Data Warehouse Administration Console (DAC), and Informatica PowerCenter, create an Oracle RAC database on BIDWHOST1 and BIDWHOST2 to hold the following:
For information, see the following:
You must run the Oracle BI Applications Repository Creation Utility (RCU) to create the following Oracle BI Applications schemas:
Before running Oracle BI Applications RCU, you must copy the export dump files from the RCU_HOME /rcu/integration/biapps/schema directory to the BIDWHOST1 and BIDWHOST2 Oracle RAC database nodes. These dump files will be required when entering values in the Custom Variables screen (Figure 18-5). The directory should have read/write access since logs are written to it during the import.
For more information, see "Create the Oracle BI Applications Schemas Using RCU" in Oracle Fusion Middleware Configuration Guide for Oracle Business Intelligence Applications .
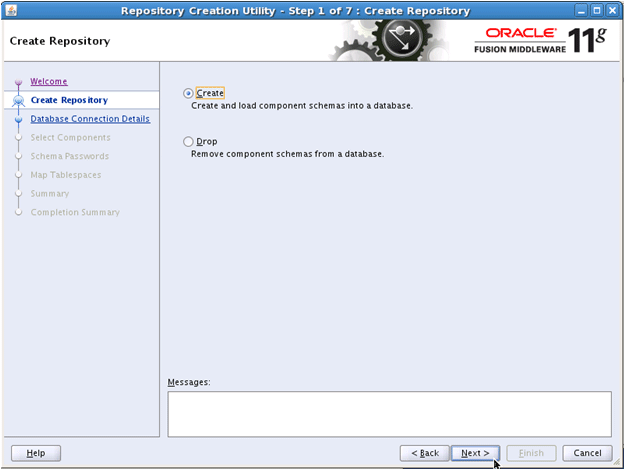
To run the Oracle BI Applications RCU:
cd RCU_HOME/bin ./rcu
Figure 18-2 Create Repository Screen
Figure 18-3 Database Connection Details Screen
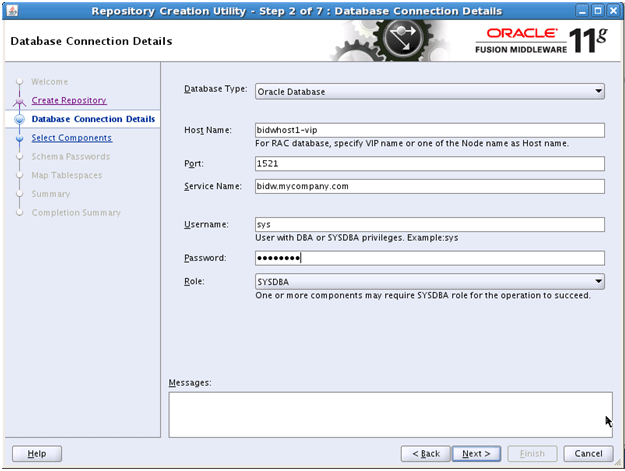
Figure 18-4 Select Components Screen
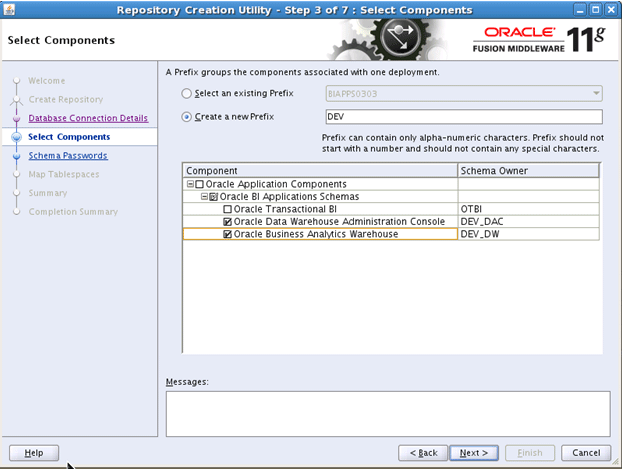
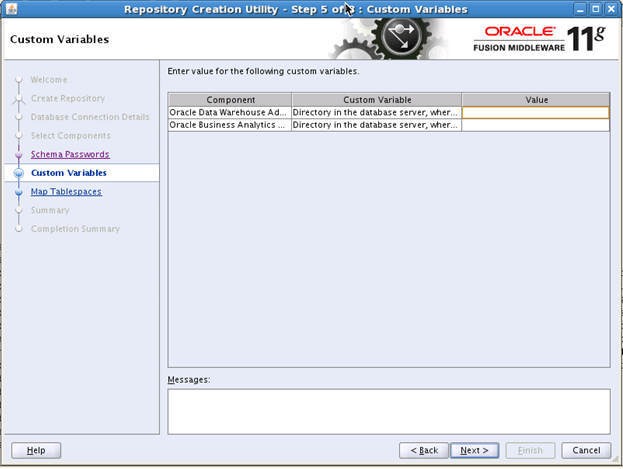
Figure 18-5 Custom Variables Screen
Informatica is a third-party component that is required for Oracle BI Applications implementation. INFA_HOME , which refers to the user-specified Informatica installation directory on the machine that hosts Informatica PowerCenter Services, must be on shared storage that is accessible from CRMHOST1 / and CRMHOST2 / where DAC Server will be configured.
Download the Informatica PowerCenter software. For information about how to do so, see "Installing and Setting Up Informatica PowerCenter" in Oracle Fusion Middleware Configuration Guide for Oracle Business Intelligence Applications . During installation of Informatica PowerCenter, use the Oracle RAC database installed in Section 18.2.1, "Creating Databases for Oracle Business Intelligence Applications Components" when prompted.
This section includes the following topics:
The DAC, Oracle BI Applications Configuration Manager, and Oracle Fusion Functional Setup Manager, configurations are an extension of the existing Oracle Business Intelligence domain. These procedures assume that Oracle Business Intelligence has been installed and configured during the Oracle Fusion Applications Provisioning process.
The DAC, Oracle BI Applications Configuration Manager, and Functional Setup Manager configuration is an extension of the existing Oracle Business Intelligence domain. In this extension, the Oracle BI Applications Configuration Manager, and Functional Setup Manager components are administration components and are targeted to the Administration Server. DAC will be targeted to the Oracle Business Intelligence Managed Server.
To extend the domain:
ORACLE_BASE/products/fusionapps/bi/common/bin/wlst.sh install_dwtools.py 'DOMAIN_HOME' 'INFORMATICA_SERVER_HOME' 'INFORMATICA_DOMAIN_FILE' 'DW_DB_URL' 'DW_DB_SCHEMA' 'MDS_DB_URL' 'MDS_DB_SCHEMA' 'DAC_DB_URL' 'DAC_SCHEMA' 'DAC_TARGET'
'jdbc:oracle:thin:@(DESCRIPTION= (ADDRESS_LIST=(LOAD_BALANCE=on) (ADDRESS=(PROTOCOL=TCP) (HOST=BIDWHOST1)(PORT=1521))(ADDRESS= (PROTOCOL=TCP)(HOST=BIDWHOST2) (PORT=1521)))(CONNECT_DATA= (SERVICE_NAME=bidw.mycompany.com)))'
'jdbc:oracle:thin:@(DESCRIPTION= (ADDRESS_LIST=(LOAD_BALANCE=on) (ADDRESS=(PROTOCOL=TCP) (HOST=FUSIONDBHOST1)(PORT=1521)) (ADDRESS=(PROTOCOL=TCP) (HOST=FUSIONDBHOST2)(PORT=1521))) (CONNECT_DATA= (SERVICE_NAME=crm.mycompany.com)))'
'jdbc:oracle:thin:@(DESCRIPTION= (ADDRESS_LIST=(LOAD_BALANCE=on) (ADDRESS=(PROTOCOL=TCP) (HOST=BIDWHOST1)(PORT=1521))(ADDRESS= (PROTOCOL=TCP)(HOST=BIDWHOST2) (PORT=1521)))(CONNECT_DATA= (SERVICE_NAME=bidw.mycompany.com)))'
You must restart the Administration Server for this configuration to take effect.
ORACLE_BASE/products/fusionapps/bi/dac/scripts/copyDACDomainFiles.py
For example:
ORACLE_BASE/products/fusionapps/bi/common/bin/wlst.sh copyDACDomainFiles.py 'ORACLE_HOME' 'DOMAIN_HOME'
ORACLE_BASE/products/fusionapps/bi/dwtools/scripts/configure_dwtools.py
For example:
ORACLE_BASE/products/fusionapps/bi/common/bin/wlst.sh configure_dwtools.py 'WEBLOGIC_ADMINISTRATOR' 'WEBLOGIC_ADMIN_SERVER_HOST' 'WEBLOGIC_ADMIN_SERVER_PORT'
Run the following WLST script on CRMHOST1 :
ORACLE_BASE/products/fusionapps/bi/dwtools/scripts/configure_rpd.py
$ cd ORACLE_BASE/products/fusionapps/bi/dwtools/scripts/ $ ORACLE_BASE/products/fusionapps/bi/common/bin/wlst.sh configure_rpd.py 'DOMAIN_HOME' 'DW_DB_URL' 'DW_DB_SCHEMA' 'MASTER_BI_INSTANCE_HOME' 'WEBLOGIC_ADMIN_SERVER_HOST' 'WEBLOGIC_ADMIN_SERVER_PORT' 'WEBLOGIC_ADMINISTRATOR'
'jdbc:oracle:thin:@(DESCRIPTION= (ADDRESS_LIST=(LOAD_BALANCE=on) (ADDRESS=(PROTOCOL=TCP) (HOST=BIDWHOST1)(PORT=1521))(ADDRESS= (PROTOCOL=TCP)(HOST=BIDWHOST2) (PORT=1521)))(CONNECT_DATA= (SERVICE_NAME=bidw.mycompany.com)))'
# Set Informatica Environment for DAC Server . $/config/dac/dac_env.sh
$ cd /u02/local/oracle/config/BIInstancen/bin $ ./opmnctl stopall $ ./opmnctl startall
ORACLE_BASE/config/domains/CRMHOST1/BIDomain/dac/conf-shared/ server.properties ORACLE_BASE/config/domains/CRMHOST1/BIDomain/dac/ conf-shared/security/repository/cwallet.sso
SELECT * FROM W_ETL_REPOS WHERE ROW_WID='DACServerURL';
The Data Warehouse Administration Console (DAC) Server is a singleton: only one active Oracle DAC Server is used at any given time. The Oracle WebLogic Server Migration feature is used to protect Oracle DAC server from failures. The Oracle WebLogic Managed Server in which Oracle DAC server runs is listening on a virtual IP that gets migrated to another node when the failure occurs.For more information on server-migration features, see Chapter 17, "Setting Up Server Migration for an Enterprise Deployment."
ORACLE_BASE/products/fusionapps/bi/dac/scripts/moveDACConfigLocation.py
For example:
ORACLE_BASE/products/fusionapps/bi/common/bin/wlst.sh moveDACConfigLocation.py 'DOMAIN_HOME' 'DAC_SHARED_LOCATION'
$ cd /u02/local/oracle/config/BIInstancen/bin $ ./opmnctl stopall $ ./opmnctl startall
For more information, see the following sections in Oracle Fusion Middleware Configuration Guide for Oracle Business Intelligence Applications :
To enable Oracle HTTP Server to route to the Data Warehouse Component Managed Server, you must set the WebLogicHost parameter.
To set the WebLogicHost parameter:
RedirectMatch 301 ^/DACServer$ /DACServer/ RedirectMatch 301 ^/biacm$ /biacm/ # DAC ServerSetHandler weblogic-handler WebLogicHost BIVH1 WebLogicPort 10217 ## Context roots for application biacm SetHandler weblogic-handler WebLogicCluster BIADMINVH:10201 ## Context roots for application fsm SetHandler weblogic-handler WebLogicCluster BIADMINVH:10201
WEBHOST1> ORACLE_BASE/config/CommonDomain_webtier/bin/opmnctl restartproc ias-component=ohs1 WEBHOST2> ORACLE_BASE/config/CommonDomain_webtier1/bin/opmnctl restartproc ias-component=ohs1
Perform the following additional tasks:
SQL> UPDATE "prefix_DAC"."W_ETL_REPOS" SET VALUE = 'http://biinternal.mycompany.com:7777/DACServer' WHERE ROW_WID = 'DACServerURL'; SQL> commit;
To validate, access the following URLs:
Verify URLs to ensure that appropriate routing is working from the HTTP Server to the DAC Server.